Showing posts with label Reviews. Show all posts

Monday, September 22, 2014

I've got a PEEK on my site. Falow up !


 Alright !
It took me a bit more time that I though to correct my website and send an other request to PEEK to review my site.
But totally worth it !!!
So to conclude it. If you have professional site. Do it. It's free and help you to improve it. Period !!!
http://peek.usertesting.com
Here is my last review
http://peek.usertesting.com/result/3423478885241?autoplay=true

Thursday, April 3, 2014

I've got a PEEK on my site.

I'm always wondering what is the first impression of the people when they're going on my site for the first time. Then I find out about PEEK http://peek.usertesting.com/
It's a service that ask randomly a person to go on your website and give a recording of their first impression.
It's super easy to do, Just give your website address and email and it's FREE...

http://peek.usertesting.com/
So I gave a try. I took a couple days for the PEEK video to be emailed to me.
At first it was pretty frustrating since the person I've got didn't know how to scroll on my site and barely saw anything of my work. So made some judgment on the 10% visible to her.
So I didn't know if is it something that most of the people that goes on my site had difficulty with and I should address it immediately or it was just that visitor...
Here is the link of the video: http://peek.usertesting.com/result/637564103140?autoplay=true


Then I asked around and it turned out that it was an issue and some people had trouble to figure out the lateral scrolling on my site to view the rest of the photos.

So the next 2 days I redesigned my site. here it's how it looks now. http://www.fredericphotography.com

Since they allowed 3 Free PEEKs per month. I sent an other request a couple days ago. Should come anytime soon. I'll do an update as soon as I get the video.

I think that anyone who has an professional website should do it. You don't always know who goes to your website and what are their purpose. But a percentage of them are visiting it for some interest of maybe hiring your services and maybe few are leaving your pages because they cannot figure out how to navigate...

Give it some thought, give it a try and let me know your experience.


Sunday, June 26, 2011

FLASHPOINT 86in PARABOLIC SILVER UMBRELLA first test

I bought an 86in parabolic silver umbrella a couple months ago. Here are the details of when I received it.

I got it because I was planning a shoot with a specific look. My plan was to have the models against the wall or close enough to leave a shadow for a dimension appearance.

I wanted a strait on light source, very sharp on the model to give a dynamism on the very colorful shoot that I had in mind. One of the challenges was the shadow, I didn't want it to be too strong and over power the models.

At the time I had 3 different light sources to choose from, but all fell short of getting me the look I wanted.

-1- A soft-box: it would have left a soft and discrete shadow on the wall but too soft on the models.

-2- A 7in reflector: This would have produced a nice dynamic sharp light on the models but it would leave a too pronounced shadow on the wall. Also the light beam would have been too narrow and cause too much falloff in full body shots.

-3- A ring-flash: I like the look it would have done on the models but not sure that the hallow shadow around the models would have given the dynamic feeling I was looking for.

After much research, it was clear that to get the look I wanted, I had to use a huge parabolic umbrella. The one from Profoto is too expensive. So I took my chances with this $70 parabolic umbrella from Flashpoint.

This was my very first time shooting with the it.
I hadn't even done a test prior to this shoot.
But thank god I got the results I wanted at a great price.


In this photo you can clearly see the details of the shadow but still very soft.


In this shot you can see how direct the light on Maya is. Uniform head to toe.
It makes her skin and the satin outfit almost luminescent with pronounced shadows.


I'll do a more detail review later on.

Friday, April 8, 2011

FLASHPOINT 86in PARABOLIC SILVER UMBRELLA

Just received the 7 feet parabolic umbrella that I order from Adorama. $70 plus shipping, a huge difference compare the $1850 Profoto Giant Silver 210 (7Ft) Umbrella.
Obviously the qualities of the 2 items are different. But I feel that I may still get the look I'm looking to do with it.

It's BIG !!! Here it is in my studio next to a 34x45 inch soft box. Note that my ceiling are 12 feet high.


I'm going to do some test with it very soon and make a review out of it.

You all have a wonderful weekend.

Cheers,
Frederic.

Wednesday, October 27, 2010

PORTFOLIO FROM THE HOUSE OF PORTFOLIOS QUESTION

To answer Tia's Questions on the house of portfolio review :

Hi,

I am planning to buy a portfolio and I like your post about your new book from houseofportfolio. I would like to know if if the pages in your new book are closed in three sides and only open on the top, or are also open on the bottom.

Can you post a picture of the book opened in the middle to show how the pages keep flat.

Sorry if I ask you so many questions but is an important investment and I would like to be sure before I buy it.

TIA.

Answer :

Hi Tia,

The pages are open at the top and the bottom.

Here is a picture of the book open.


Hope that help.
Good luck on portfolio making...

Cheers,
Frederic.

Sunday, October 10, 2010

NEW PORTFOLIO FROM THE HOUSE OF PORTFOLIOS

It's been something like 15 years since the last time I changed my portfolio book.
So I decided to order a new one from The House Of Portfolios.
A company based in New York for over 20 years.
They are making by order custom portfolio books.
With covers made of Leather, Fabric, Plexiglass, Metal...

I chose "fashion red" Genuine Leather.

It took approximately 3 weeks to have it delivered.


Very well secured packing.


The red leather is pretty close to the sample you see on there website.
I just wished it was a bit brighter. More like red Ferrari. But that's just my preference.


The back cover has a pouch for your Zed-cards.

Very well crafted.


My custom logo was precisely stamped. Even where the letters were very close.

Some of the Acetate pages where a bit dusty. But no biggie they were easy to clean.


CONCLUSION
They are many ways to show your work.
The cheap way: Already made portfolio books that you can buy from your camera store.
The expensive Way: Have a very creative designer make you a very unique book that reflects your work.
Or have a more classy well built custom made book from the House of Portfolios.
Because what you want is a professional presentation that says confidence and you're in the game. Happy I did it.

PROS
Very well crafted down to the small details.
Make your work look very professional.
Worth the money.

CONS
The turn around time is three weeks.
Mine came a bit dusty.

Product information is personal opinion and provided for informational purposes only. I have no affiliation with the brands or companies mentioned here.

Friday, January 15, 2010

LEICA S2

I had a quick test drive with the Leica S2


Leica S2+70mm f/2.5ASPH, 1/125, F/7.5 , ISO 160
Frederic Charpentier ©

Razor sharp picture.
The photo you are seeing has no post production and as you can see the colors are very natural. The contrast just the way I like it out of the box.
I don't how the other lenses behave, but the 70mm is super sharp edge to edge.
Here are a couple of 100% crops. Click on the photos to see the full version.


I'm very impress !!!

Sunday, August 3, 2008

New Profoto light

Bye bye Novatron.
Hello Profoto !!!
After many years of loyal service, my Novatron light kit was falling a part.
So it was time to get new Strobes. It's not that I was unhappy with the Novatron system, but it's a small company and I wanted to expand, so I decide to go for a different brand that could support my ambition.

First I explored the big names like Bowens, Bronclor, Dyna-lite etc.... And after all that, I went for the Profoto brand for 3 very good reasons. First, Profoto is a very trusted Swedish company known for their quality. Second, is the fact that you can rent their really large panoply of lights and accessories pretty much all around the world. And third, I GOT A GREAT DEAL! I got a kit that includes two 600 w/sec mono-lights, two light stands, two reflectors and two umbrellas in a beautifully crafted carrying case.

Okay let me give you a little perspective here. One Profoto ComPact-R 600 Monolight without the reflector goes for $ 804.95. And that's just about the lowest price I could find. I got a set of two and everything else for $ 1699.95 PLUS a $100 instant rebate at Sammy's Camera here in Los Angeles, CA.

Wireless baby... Yes wireless !
Did I mention that these babies have a built in radio triggering system?

So I got myself a Pocket-Wizard and the Sekonic L-358 flash-meter and now I'm free to move around with no cable attached to my camera or flash-meter.
I have to say, not only are they beautifully designed, they really look and feel well made.
I completed my kit with a barndoor and Softbox from Photoflex. My preferred basic set-up.


I've just started working with them and so far so good.

Now I'm headed out into the real world with theses babies and in a few weeks I'll write you a full review.

Product information is personal opinion and provided for informational purposes only. I have no affiliation with the brands or companies mentioned here.

Monday, June 30, 2008

D300 Picture Control Comparison !

As a Nikon D300 owner I was pretty happy with the default picture control modes of this camera. The standard mode worked well for my everyday point and shoot and the neutral modes for portraits provided good skin tone. But that was until I got curious about the fact that some D300 photographers were missing the D2X picture modes and raving about the fact that now the D2X modes were available for the D300!

So like most Nikon D300 owners, I uploaded the D2X Picture Controls, available on the Nikon Europe site and while I was at it, I uploaded some curves that imitate some Fuji films from This Site.

I wanted to see for myself what were the real differences between all of these picture control modes and see which would serve me the best and for what purpose.

So I took a color card and asked my lovely partner in life to hand model for the skin tone reference. Each photo was shot exactly the same way: Manual Mode, Aperture F9, Shutter Speed 1/80s, 400 ISO and with the same custom White balance.

I did this comparison board so you could decide for yourself.


But here are my thoughts:
-Of all the picture control settings, the D2X Mode II is definitely the closest to the real life skin tones of the hand and color test card. The Default Neutral mode comes in second

-I really like the Fuji Astia and the Superia Reala, although this one is a touch too bright, I like them both. They are warm but not too saturated .

-The Velvia was obviously too bright and doesn't look anything like the Fujifilm that I know. One could easily fix this by twesting etc. but I just don't want to be bothered with that. I may just delete it!

-The Vivid default mode. Well too vivid for my taste!

-I can see how the D2X Mode III could be very nice for landscapes, just as Nikon recommended.

So after seeing so many different curves uploads options and discovering some new favorites of my own, I'm saying bye bye to that default standard setting and highly recommend you check this out for yourself. Thank You NIKON!!!

PS: Nikon's recommendation for achieving a level of brightness similar to that of images captured with the D2X and the D2XS, is to set Picture Control Brightness to -1.

Friday, June 6, 2008

The Tamrac Adventure Messenger 4 Review

Lately I have been shooting more stock photography and love carrying my DSLR with me all the time, so I don't miss any photo opportunities. Like most of us I have a couple of camera bags that are nice and practical. But not wanting to look like a tourist or paparazzi, I used to put my camera in a small camera bag then stuff it in my regular backpack. This way I just looked like a dude with a backpack. However, that wasn't working. It was a bit much every time I wanted to take my camera out. Sometimes I even let a photo opportunity pass me by, just thinking of the trouble it would be to reach for my equipment.

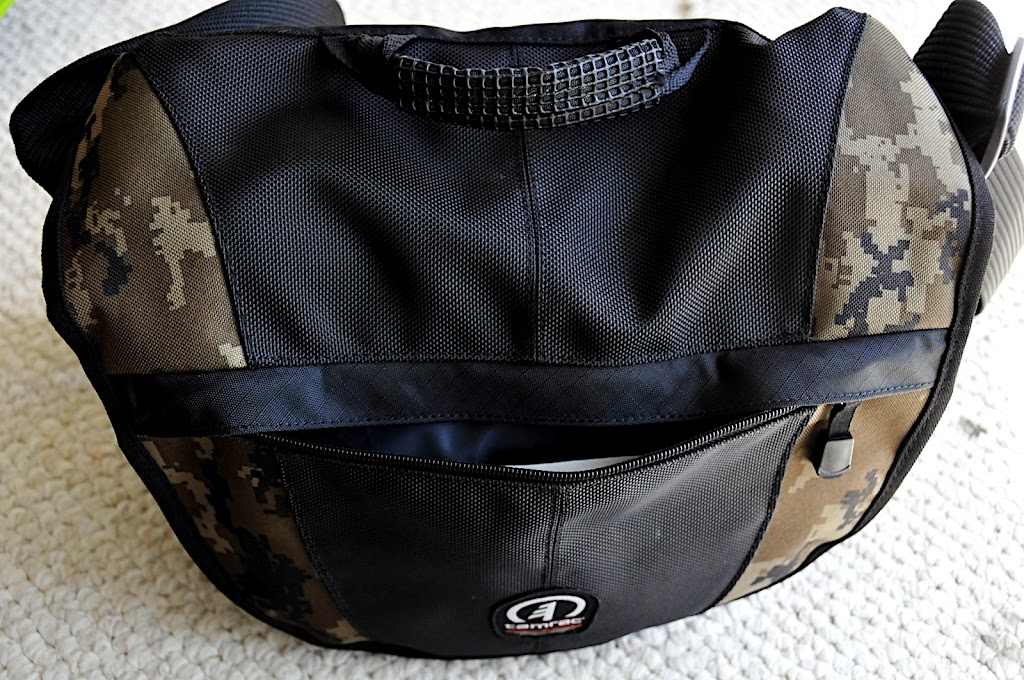
Then a couple of months ago I got my hands on the "Tamrac Adventure Messenger 4" the one with a trendy camouflage design.


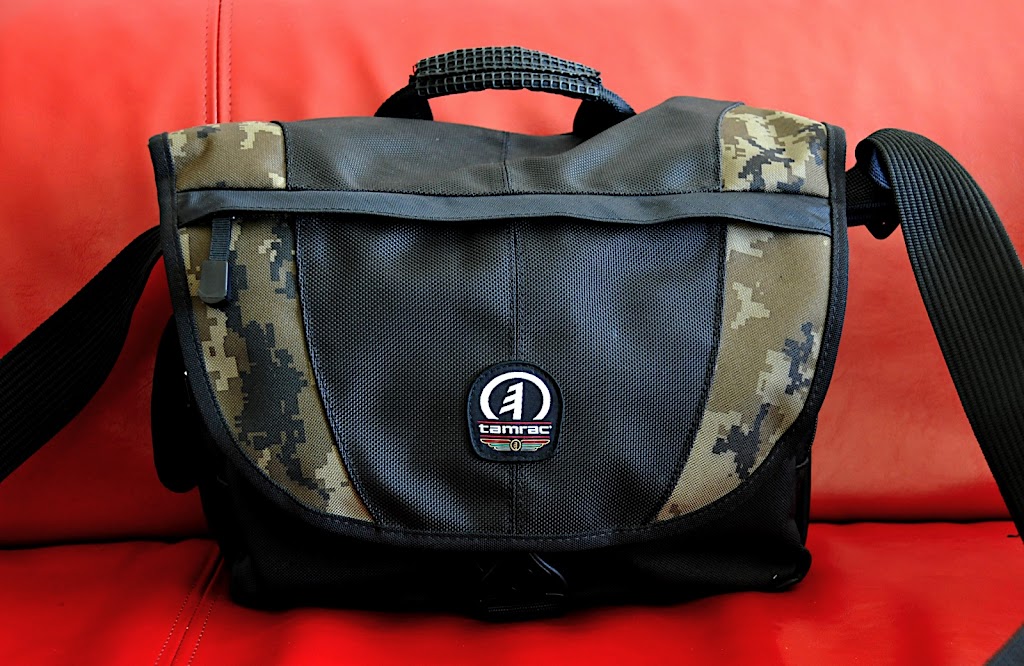
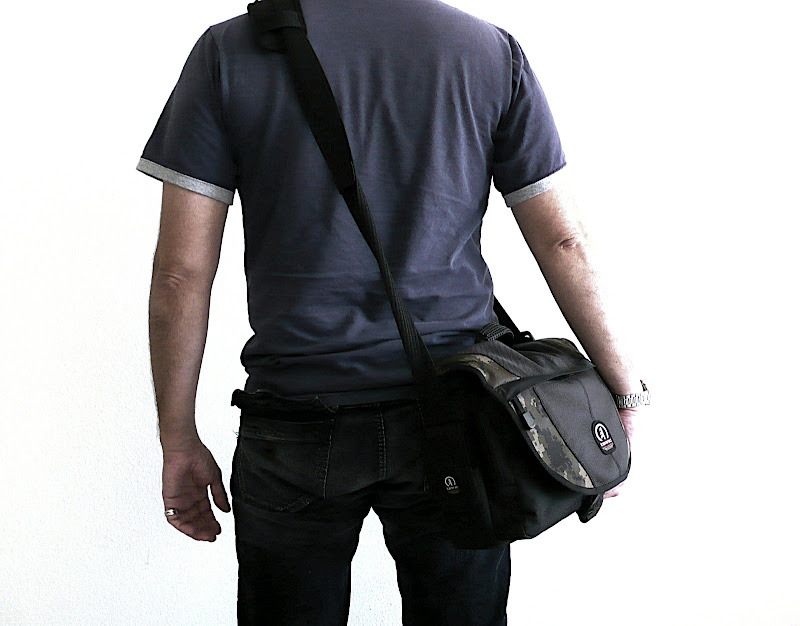
It really does look like a messenger bag, has a fashionable statement and a nice slim profile.


Once packed with my equipment and strapped on. It feels and looks like a regular messenger bag full of books, my superman outfit or just my lunch.


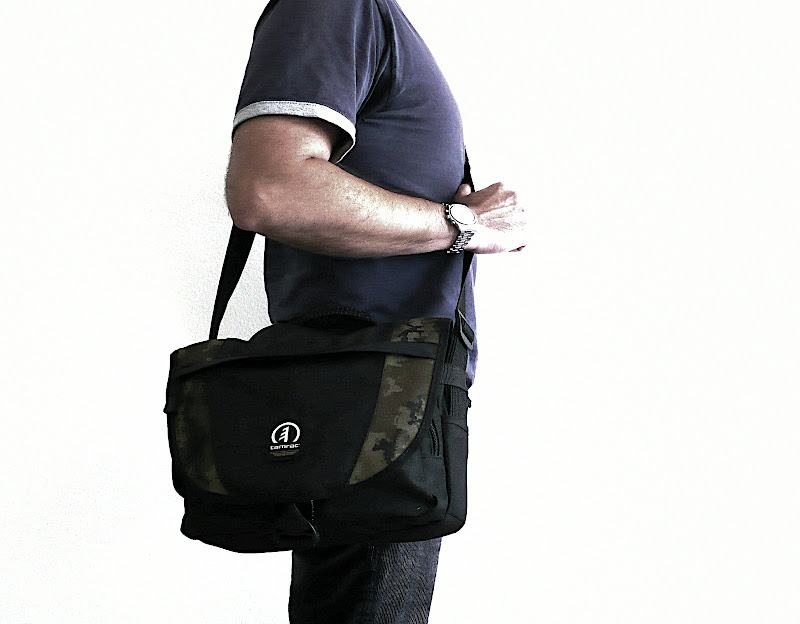
That's what first attracted me about this bag. It's so discrete!


It's perfect for everyday use when you just want to carry only what's necessary. For me that means: one DSLR body, one Flash, one zoom 18-200mm and one 105mm macro lens. This bag fits them all pretty neatly.


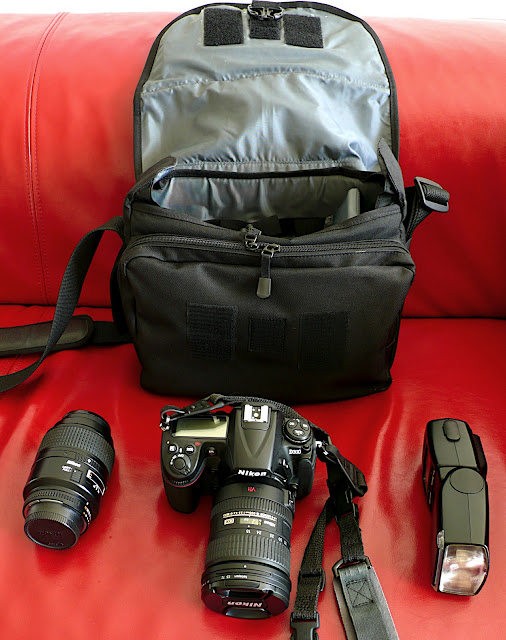
As you can see, because of its slim profile, it wouldn't be able to fit a Nikon D3 or a Canon 1D. But it's perfect for other bodies such as: the Canon 5D, 40D, the Nikon D80, D4o and others. In this case it works for the D300, without of course any Battery pack attached.


As plain as the bag looks, it does have some nice special features. Like the front pocket with two compartments to keep things nicely organized (wallet, notepad, pen, LensPen, memory cards, batteries, Altoids...).


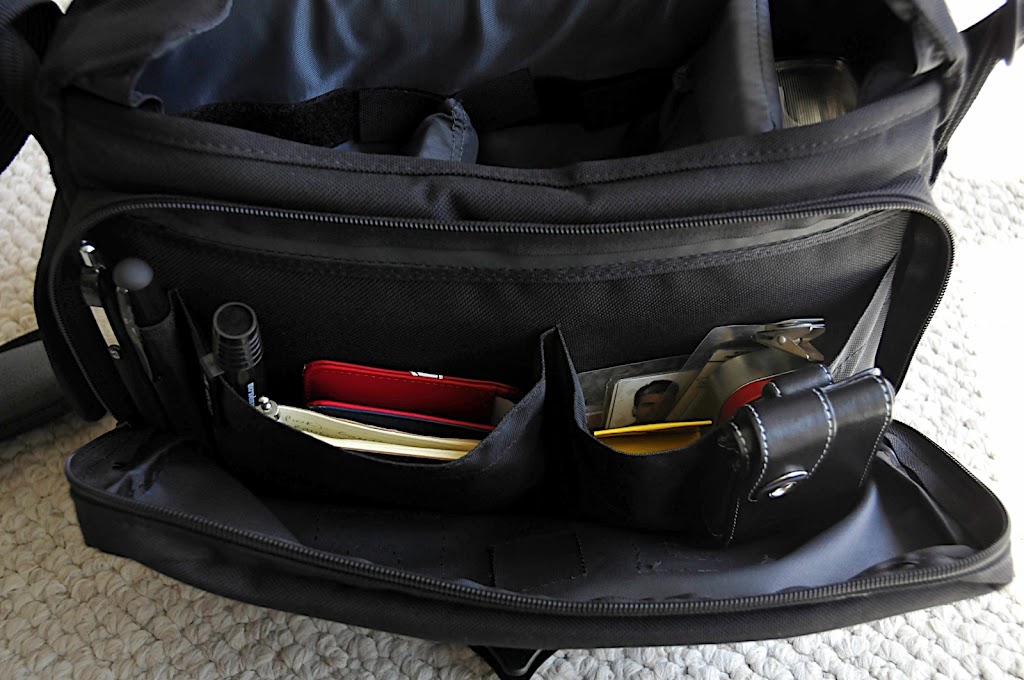
The front flap has a zip pocket where I keep little things like a microfiber cloth...


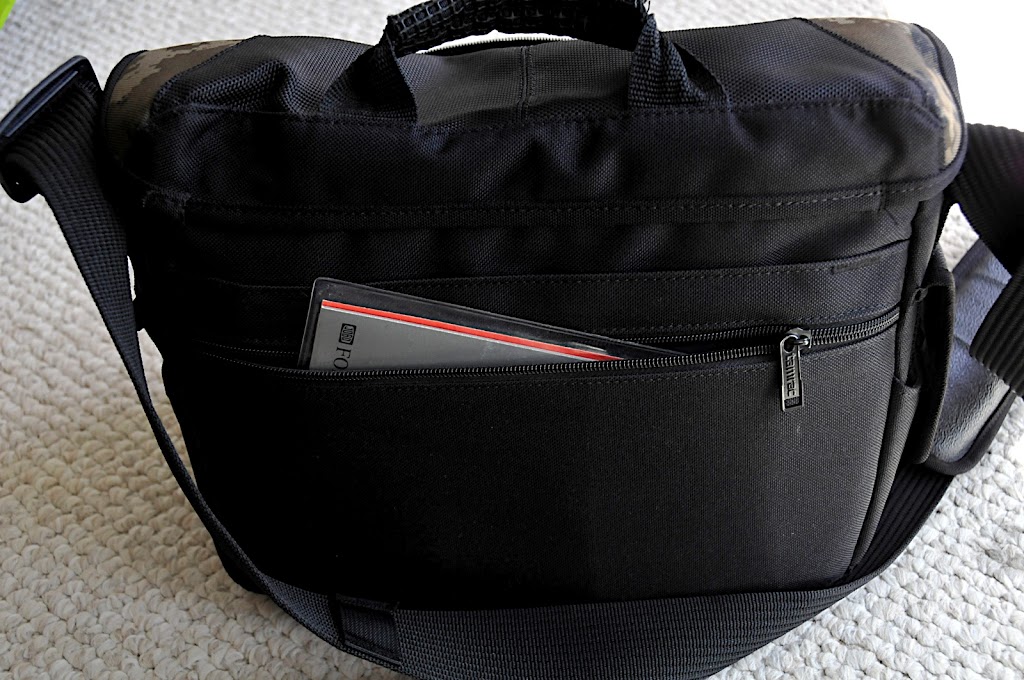
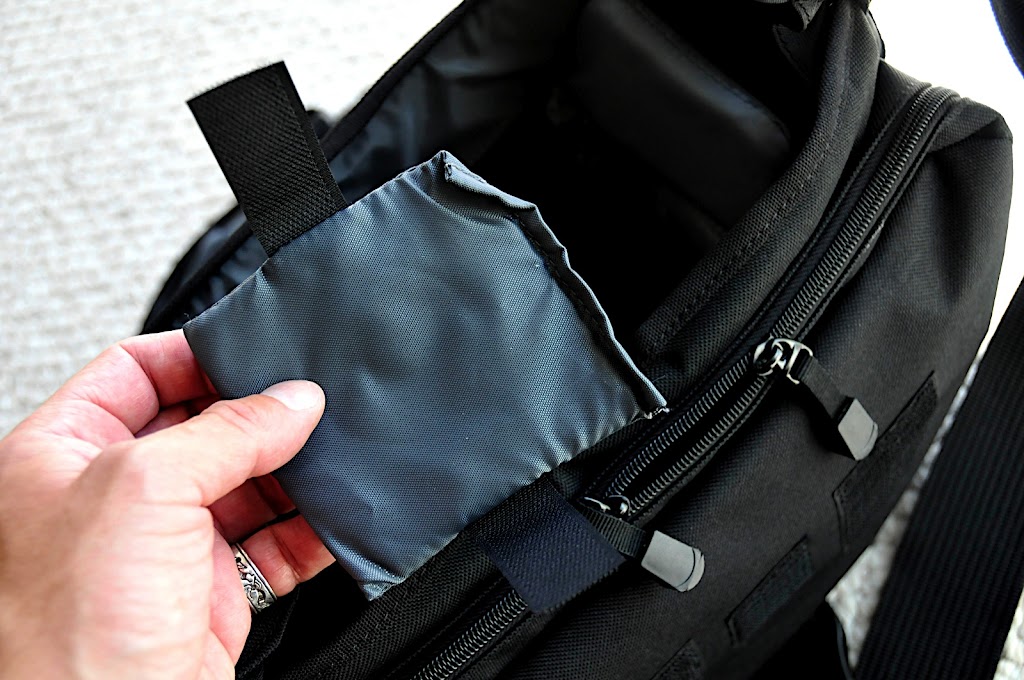
The back has a flat zipper pocket for papers. It's where I keep my gray card .


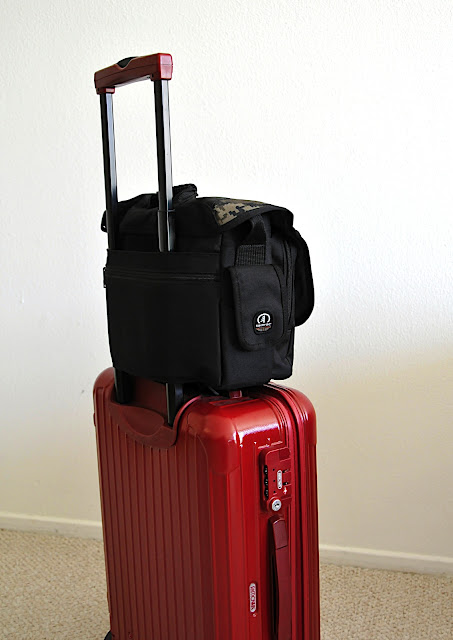
But also in the back there is this flap for using on a Piggy Back. I guess for some that can be useful ?


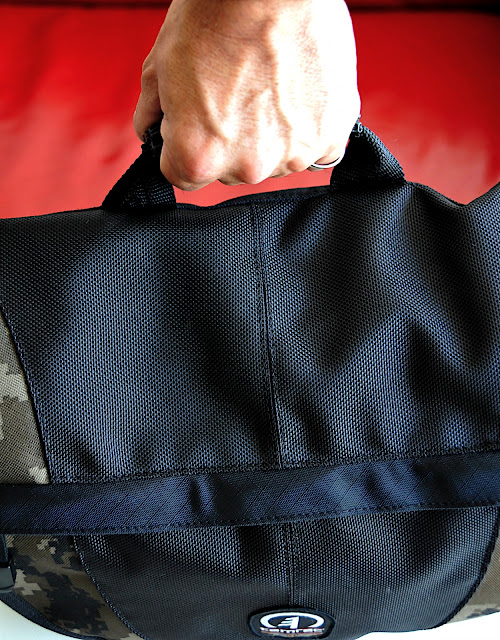
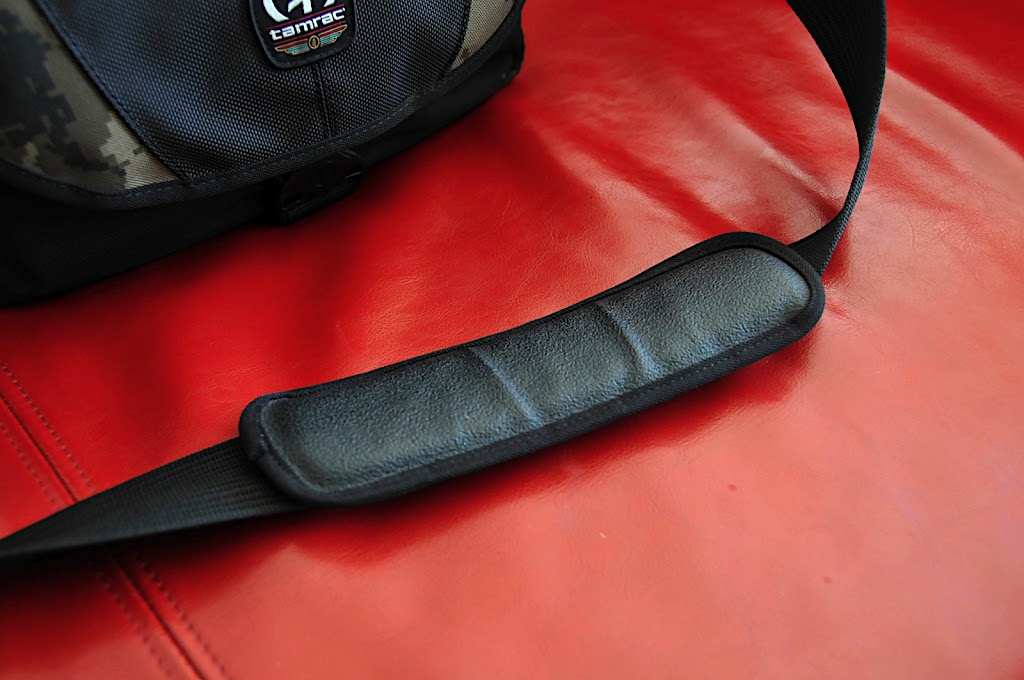
Personally I'm really keen on the handle. It's handy and we don't always see this on a camera bag.


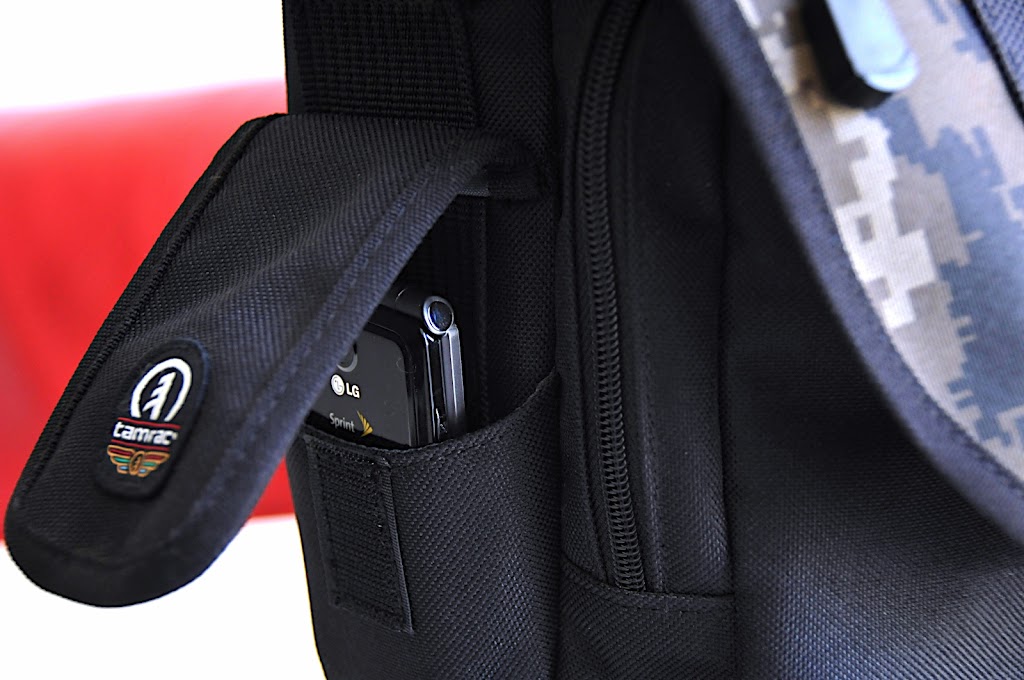
The side has a small pocket for your cell or Ipod or Iphone or whatever your cool gadget of choice is these days.


The strap has a nice comfortable shoulder pad.


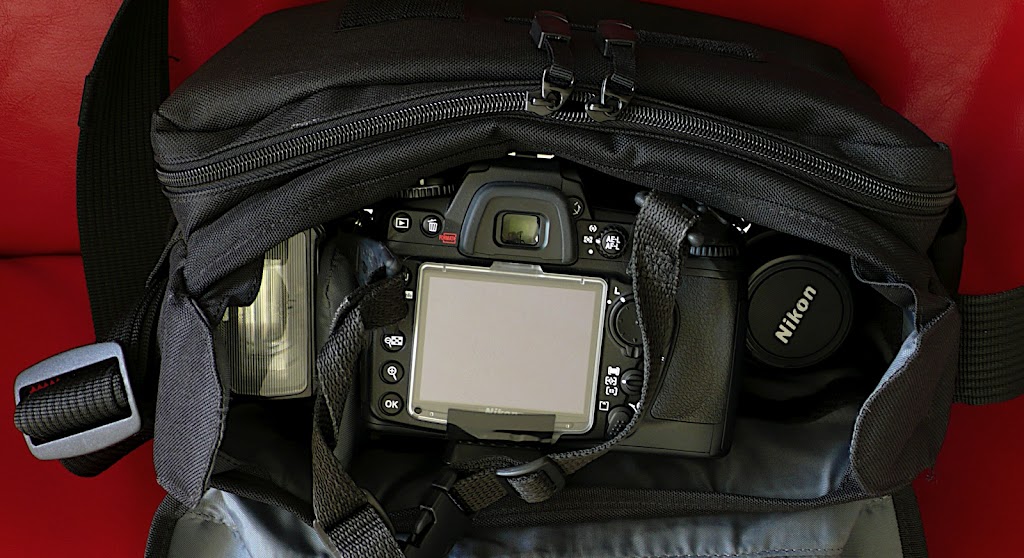
The inside has two vertical dividers and three horizontal dividers that I keep at the bottom of the bag for extra padding. Given the way I pack my equipment, they work better for me there.

In general, the bag is well constructed, and the entire case is nicely padded. Although, I do feel that the foam used could be a bit more rigid. Lately, I've seen camera bags on the market with new materials that are semi rigid/semi soft that look more protective.

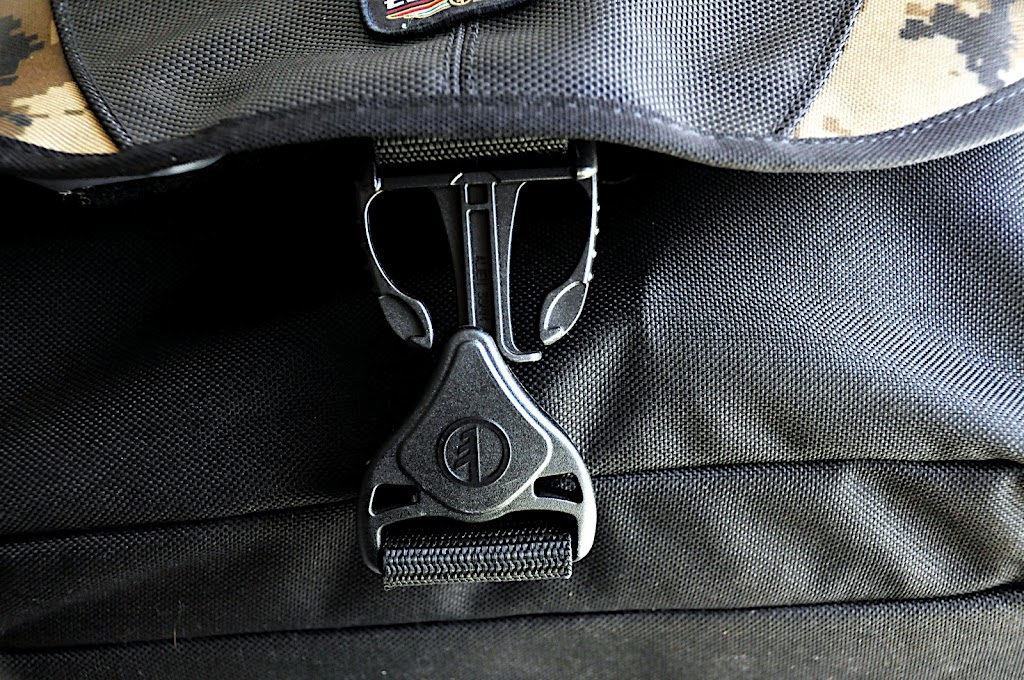
The one thing I'm not crazy about is the bag's buckle closure.


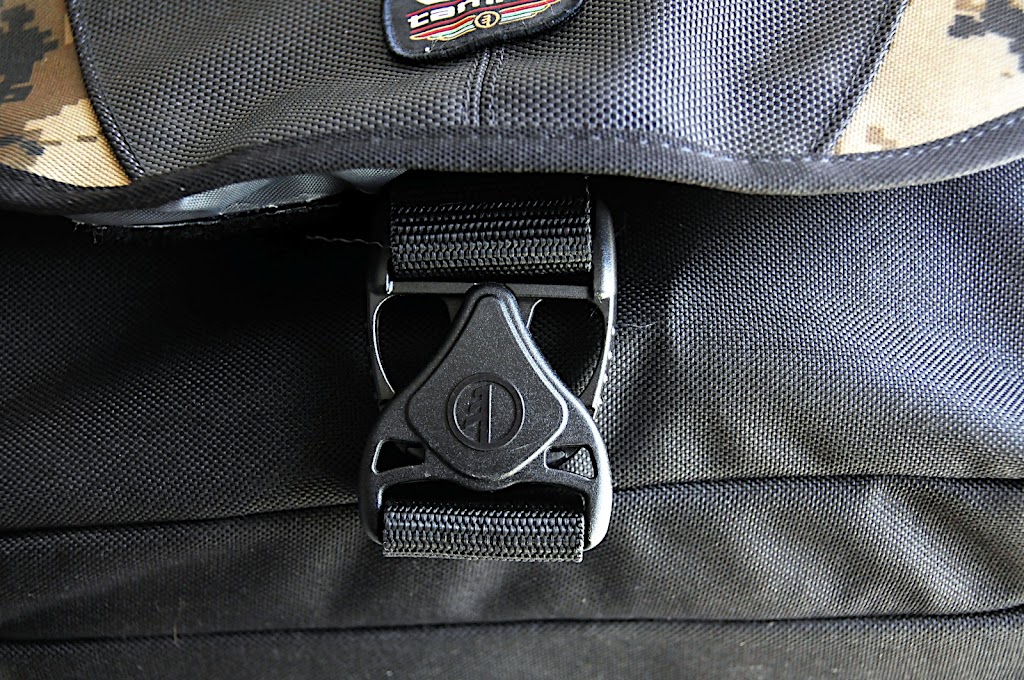
I looks good, but I have a hard time closing it with one hand. The ends have to line up perfectly before they slide in together and click, something my fingers don't agree with.


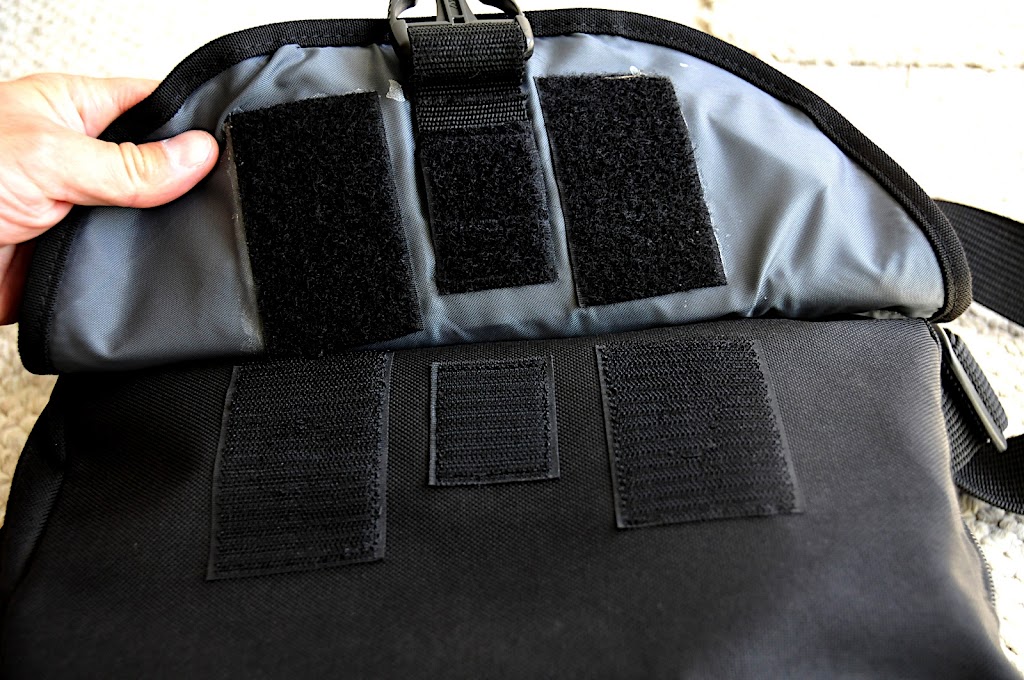
The flap has a little piece of Velcro, that helps to keep it closed,when you're on the move and can't click the buckle. But I find it too flimsy, not secure enough. So I sewed two big pieces of Velcro on there. You can see in the picture, the one in the middle is the original and the two on either side of it are the ones I added for peace of mind.


CONCLUSION
So to wrap-up my review. I can honestly say, I love the Tamrac Adventure Messenger 4 bag. It's discrete and practical. I can access all the contents easily and it's comfortable to carry around. I wasn't crazy about the small piece of Velcro, but it's fixed now. I'm going to have to do something about that annoying buckle soon. I'll post whatever I come up with. Other than wishing for more rigid padding, the bag looks well made. I'm using it almost everyday, so I'm going to find out pretty quickly how durable it really is.

PROS
Discrete, Messenger bag look
Slim
Comfortable
Practical, has a lot of useful features
Cool looking

CONS
Hard to close buckle
Small flimsy Velcro
Wish for firmer foam protection

Photography Search